Copper pipes have long been a popular choice for plumbing systems due to their durability and resistance to corrosion. However, even the most well-maintained pipes can develop leaks or damage over time. When faced with a copper pipe in need of repair, it’s essential to address the issue promptly to prevent further damage and water wastage. In this article, we’ll delve into the various methods and steps involved in repairing copper pipes, helping you navigate the process with confidence.
Common Causes of Copper Pipe Damage
Before diving into the repair process, it’s crucial to understand what can lead to copper pipe damage in the first place. Common causes include:
- Corrosion: Over time, exposure to water and chemicals can cause copper pipes to corrode, leading to thinning of the pipe walls and eventually leaks.
- Freezing: When water inside a copper pipe freezes, it can expand and create cracks or ruptures in the pipe.
- Mechanical Damage: Physical impacts, like accidental hits or contact with sharp objects during construction, can lead to dents, pinholes, or fractures in copper pipes.
- Aging: Copper pipes, like all materials, have a lifespan. As they age, they may become more susceptible to leaks and failures.
Assessment and Safety Precautions
Before attempting any repair, it’s essential to assess the extent of the damage. Here are the steps to follow:
- Shut off the Water: Turn off the water supply to the affected pipe to prevent further leakage.
- Drain the Pipe: Allow any remaining water in the pipe to drain out completely.
- Inspect the Damage: Identify the location and severity of the damage. Is it a small pinhole leak or a larger rupture?
- Safety First: When working on plumbing repairs, safety is paramount. Wear protective gear, including gloves and safety goggles, to prevent injury.
Copper Pipe Repair Methods
The appropriate repair method will depend on the extent and type of damage to the copper pipe. Here are several common repair methods:
- Epoxy Putty: Epoxy putty is a quick and temporary solution for small leaks. It’s a moldable substance that can be applied directly to the leak site. While it may buy you some time, it’s not a permanent fix.
- Compression Fittings: Compression fittings are a straightforward solution for minor leaks. They involve sliding a compression sleeve and nut onto the damaged area and tightening them to create a watertight seal.
- Soldering/Welding: Soldering or welding is a more advanced repair method suitable for larger leaks or ruptures. This involves melting solder into the damaged area to seal the leak. It requires skill and the right tools.
- Pipe Clamp: A pipe clamp can be used to temporarily stop leaks while waiting for a more permanent solution. It wraps around the damaged area and tightens to compress the pipe, halting the leak.
- Sharkbite Slip Coupling: SharkBite fittings are designed to provide a quick and secure way to repair copper pipes without the need for soldering, clamps, or special tools.
- Cut and Replace: In cases of extensive damage, it might be best to cut out the damaged section and replace it with a new piece of copper pipe. This method ensures a long-lasting repair.
1. Copper Pipe Repair by Epoxy Putty
Epoxy putty is a versatile and easy-to-use substance that combines two components – a resin and a hardener. When kneaded together, they create a pliable and adhesive material that can bond to various surfaces, including copper pipes. Epoxy putty is particularly useful for fixing small leaks or cracks, but it’s important to note that it’s not a permanent solution. It provides a temporary fix that can buy you some time while you arrange for a more thorough repair.
Materials Needed for Epoxy Putty Copper Pipe Repair
Before you begin, gather the following materials:
- Epoxy Putty: Choose a high-quality epoxy putty designed for plumbing repairs. It should be able to adhere well to copper surfaces and withstand water exposure.
- Gloves: Wear disposable gloves to protect your hands from the epoxy putty and any potential contaminants.
- Safety Goggles: Safety goggles are essential to protect your eyes from any accidental contact with epoxy putty.
- Pipe Cleaner or Sandpaper: Clean the area around the leak with a pipe cleaner or sandpaper to remove any dirt, debris, or corrosion.
- Utility Knife: You’ll need a utility knife to cut the epoxy putty if necessary.

Step-by-Step Copper Pipe Repair Process by Epoxy Putty
Follow these steps to repair a small copper pipe leak using epoxy putty:
- Prepare the Area: Turn off the water supply and allow the pipe to drain. Clean the area around the leak with a pipe cleaner or sandpaper to ensure proper adhesion.
- Knead the Epoxy Putty: Put on your gloves and knead the epoxy putty according to the manufacturer’s instructions. Ensure that the resin and hardener are mixed thoroughly.
- Apply the Putty: Apply the epoxy putty directly onto the leak site. Press the putty firmly onto the pipe, covering the damaged area completely. If necessary, you can shape the putty to conform to the pipe’s contours.
- Allow Curing: Epoxy putty typically cures within a specified time frame (usually around 20-30 minutes). During this time, the putty will harden and create a seal over the leak.
- Turn on the Water: Once the epoxy putty has cured, turn on the water supply and monitor the repaired area for any signs of leakage. Be cautious during this step, as the repair is still temporary.
Limitations of Epoxy Putty Repair
While epoxy putty can provide a quick fix for minor leaks, it’s important to be aware of its limitations:
- Temporary Solution: Epoxy putty is not a permanent fix. It’s designed to provide a short-term solution while you make arrangements for a more thorough repair.
- Limited Strength: Epoxy putty may not hold up well under high pressure or for an extended period.
- Not Suitable for Large Leaks: Epoxy putty is best suited for small leaks, pinholes, or cracks. Larger leaks or more extensive damage will likely require a different repair method.
Epoxy putty can be a lifesaver when you’re faced with a minor copper pipe leak and need a quick and temporary solution. By following the steps outlined in this article, you can effectively seal small leaks and buy yourself some time before arranging for a more permanent repair. Just remember that while epoxy putty is handy, it’s not a substitute for a thorough and lasting plumbing repair. Always prioritize safety, and if you’re uncertain about the extent of the damage or the appropriate repair method, consider consulting a professional plumber to ensure the longevity and efficiency of your plumbing system.
2. Copper Pipe Repair with Compression Fittings
Compression fittings are a type of plumbing connection that involves two components: a compression nut and a compression sleeve (also known as a ferrule). These fittings are designed to create a watertight seal by compressing the sleeve against the pipe when the nut is tightened. They are particularly useful for fixing small leaks or damaged sections of copper pipes without the need for soldering or welding.
Materials Required for Compression Fitting Copper Pipe Repair
Before you start the repair, gather the following materials:
- Compression Fitting Kit: Purchase a compression fitting kit that matches the size of your copper pipe. These kits typically include compression nuts and sleeves.
- Pipe Cutter or Hacksaw: You’ll need a tool to cut out the damaged section of the pipe.
- Deburring Tool or Sandpaper: Ensure the cut pipe ends are smooth and free of burrs for a proper fit.
- Adjustable Wrench: An adjustable wrench will be necessary to tighten the compression fitting.
- Teflon Tape: Teflon tape helps ensure a secure and leak-free connection.
Step-by-Step Compression Fitting Copper Pipe Repair Process
Follow these steps to repair a copper pipe using compression fittings:
- Turn off the Water: Before you start any plumbing repair, turn off the water supply to the affected area.
- Drain the Pipe: Allow the pipe to drain completely to minimize water spillage during the repair.
- Mark the Damaged Area: Identify the damaged section of the pipe that needs to be replaced. Mark the area a few inches on either side of the damage.
- Cut the Pipe: Use a pipe cutter or hacksaw to carefully cut out the damaged section of the pipe. Ensure the cuts are clean and straight.
- Deburr the Ends: Use a deburring tool or sandpaper to smooth the cut ends of the pipe, removing any sharp edges or burrs.
- Assemble the Compression Fitting: Slide the compression nut and then the compression sleeve onto one of the cut pipe ends. Make sure the sleeve is placed with the tapered end facing the pipe.
- Insert the Pipe: Insert the prepared end of the pipe into the compression fitting on the other side, ensuring it’s fully inserted.
- Tighten the Nut: Use an adjustable wrench to tighten the compression nut onto the fitting. As you tighten, the compression sleeve will be compressed against the pipe, creating a watertight seal.
- Apply Teflon Tape: Wrap Teflon tape around the threaded end of the other pipe section to ensure a secure connection.
- Attach the Second Nut: Slide the second compression nut onto the threaded end of the pipe and thread it onto the fitting. Tighten the nut with an adjustable wrench.
- Turn on the Water: Once the compression fitting is securely in place, turn on the water supply and check for any signs of leakage.
Benefits of Compression Fittings Repair Method
Using compression fittings for copper pipe repair offers several benefits:
- No Soldering or Welding: Compression fittings provide a leak-free seal without the need for soldering or welding skills.
- Reusable: Compression fittings can be disassembled and reassembled, making them convenient for future repairs or modifications.
- Minimal Tools Required: This method requires basic tools that are commonly found in most households.
- Quick and Effective: Compression fittings offer a relatively quick solution for minor pipe repairs, minimizing water wastage.
When faced with a minor copper pipe leak, compression fittings can be an excellent DIY solution. By following the steps outlined in this article, you can effectively repair the damaged section of the pipe and restore your plumbing system’s integrity. Keep in mind that while compression fittings are suitable for minor repairs, larger leaks or extensive damage may require professional assistance. Always prioritize safety and double-check your work to ensure a leak-free and reliable plumbing repair.
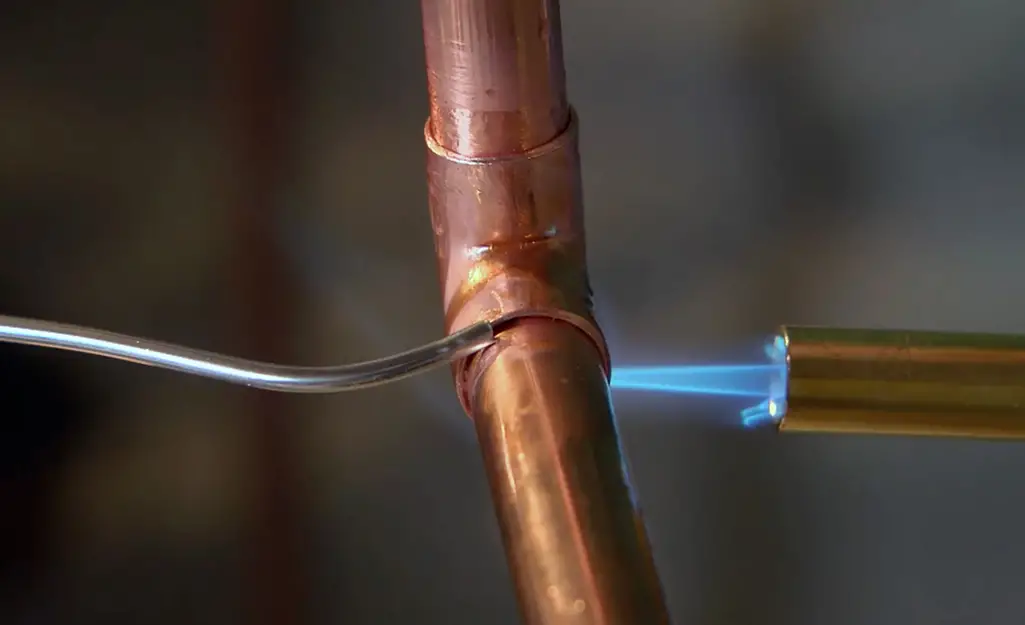
3. Copper Pipe Repair Method through Soldering
Soldering involves melting a filler metal, known as solder, to create a secure joint between two metal surfaces. It’s widely used in plumbing for connecting pipes and fittings. When done correctly, soldering creates a seamless and leak-free bond that can withstand the rigors of daily water flow.
Required Materials for Soldering Method of Copper Pipe Repair
Before you begin, gather the following materials:
- Soldering Torch: A propane torch designed for soldering copper pipes.
- Flux: A paste or liquid that helps clean and prepare the copper surface for soldering.
- Solder: Use lead-free solder specifically designed for plumbing applications.
- Pipe Cutter: A tool to cut out the damaged section of the copper pipe.
- Emery Cloth or Sandpaper: To clean and smooth the pipe ends for soldering.
- Wire Brush: For cleaning the inside of fittings.
- Heat-Resistant Gloves: To protect your hands while working with the torch.
- Fire-Resistant Cloth: To protect surrounding areas from the torch’s heat.
- Pipe Cutter or Hacksaw: For cutting out the damaged section of the pipe.
- Flame Protector or Heat Shield: To prevent excessive heat from damaging nearby surfaces.
- Safety Goggles: To protect your eyes from sparks and debris.
Step-by-Step Copper Pipe Repair by Soldering Process
Follow these steps to solder a copper pipe effectively:
- Turn off Water: Shut off the water supply to the affected area to prevent water flow during the repair.
- Drain the Pipe: Allow the pipe to drain completely to minimize water spillage during repair.
- Cut Out the Damage: Use a pipe cutter or hacksaw to cut out the damaged section of the copper pipe. Ensure that the cuts are clean and straight.
- Clean the Ends: Use an emery cloth or sandpaper to clean and smooth the cut ends of the pipes. Make sure they are free from dirt, debris, and corrosion.
- Apply Flux: Apply flux to the cleaned pipe ends and the inside of the fittings. Flux helps promote solder flow and creates a strong bond.
- Assemble the Pipe and Fittings: Insert the cleaned pipe ends into the fittings, ensuring they fit snugly. If needed, use a wire brush to clean the inside of the fittings.
- Heat the Joint: Use the soldering torch to heat the joint evenly. Move the torch around the joint, applying heat to both the pipe and the fitting.
- Apply Solder: When the joint is hot enough, touch the solder to the joint’s edge. It should melt and flow into the joint. Allow the solder to be drawn into the joint through capillary action.
- Cool and Inspect: Once the solder has flowed into the joint, remove the heat. Allow the joint to cool naturally. Inspect the joint for any visible defects or leaks.
- Turn on the Water: Turn on the water supply and check for any signs of leakage. Ensure that the repaired area is watertight and secure.
Advantages of Soldering
Soldering offers several advantages for copper pipe repair:
- Permanent Solution: Properly soldered joints provide long-lasting and secure repair.
- Strong Bond: Soldered joints create a strong and seamless connection that can withstand water pressure.
- No Threads or Sealants: Unlike threaded connections, soldered joints do not rely on threads or sealants that could degrade over time.
- Smooth Interior: Soldered joints maintain the pipe’s smooth interior, reducing the likelihood of water turbulence and buildup.
Soldering is a valuable skill for any homeowner or DIY enthusiast. By mastering the art of soldering copper pipes, you can tackle minor plumbing repairs confidently. Remember to prioritize safety throughout the process, and if you’re unsure about your soldering skills, consider seeking guidance from a professional plumber. A properly soldered joint can restore your copper pipes to their original functionality, ensuring a reliable plumbing system for years to come.
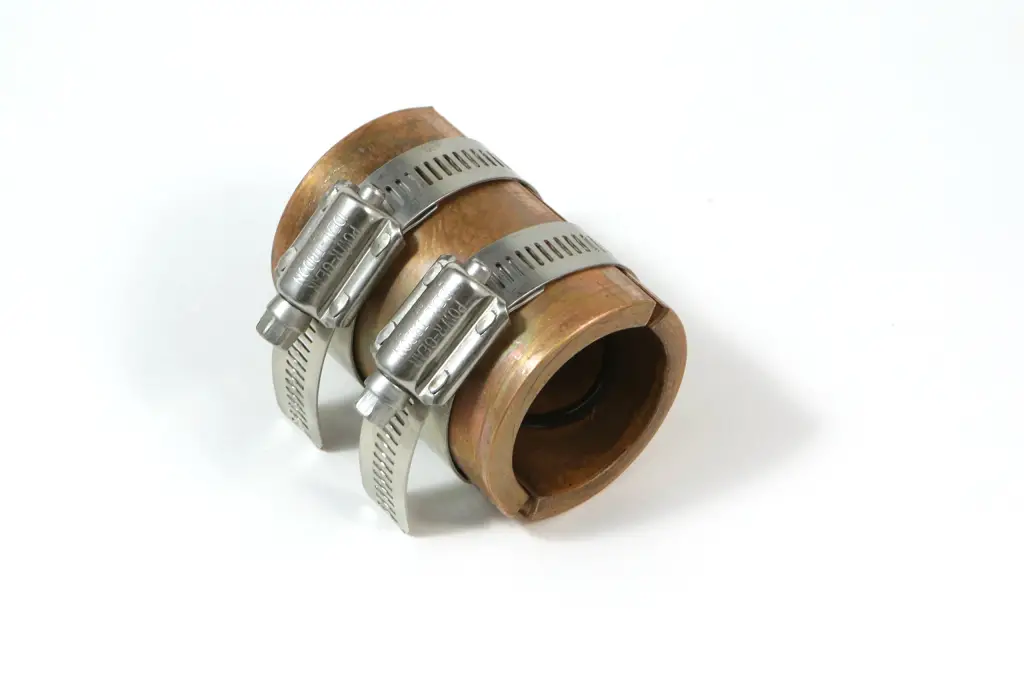
4. Copper Pipe Repair using Pipe Clamps
Pipe clamps are versatile devices designed to temporarily stop leaks in pipes until a more permanent repair can be carried out. They consist of a clamp that wraps around the damaged section of the pipe, along with rubber gaskets that create a tight seal. Pipe clamps are especially useful for small leaks, pinholes, and cracks, as they can help you minimize water wastage and potential damage to your property.
Needed Materials for Copper Pipe repair using Clamps
Before you begin, gather the following materials:
- Pipe Clamps: Purchase pipe clamps that are suitable for the size of your copper pipe and the extent of the damage.
- Rubber Gaskets: These are included with the pipe clamps and contribute to creating a watertight seal.
- Screwdriver or Wrench: Depending on the type of pipe clamp, you’ll need a tool to tighten the clamp.
- Safety Gloves: Protect your hands while working with tools and materials.
- Safety Goggles: Keep your eyes safe from any debris that might be dislodged during the repair.
- Pipe Cutter or Hacksaw: In case you need to cut out a damaged section before applying the clamp.
- Emery Cloth or Sandpaper: To clean the pipe’s surface before attaching the clamp.
Step-by-Step Pipe Clamp Repair Process
Follow these steps to repair a copper pipe using pipe clamps:
- Turn off the Water: Shut off the water supply to the affected pipe to prevent water flow during the repair.
- Drain the Pipe: Allow the pipe to drain completely to minimize water spillage.
- Clean the Area: Use an emery cloth or sandpaper to clean the area around the leak. Remove any dirt, debris, or corrosion.
- Position the Clamp: Position the pipe clamp over the damaged section of the pipe, making sure the rubber gaskets are aligned with the leak.
- Tighten the Clamp: Using a screwdriver or wrench, tighten the clamp’s screws to secure it in place. Be cautious not to overtighten, as this could damage the pipe further.
- Check for Leakage: Slowly turn on the water supply and monitor the repaired area for any signs of leakage. If the leak persists, you may need to adjust the clamp’s position or tighten it further.
- Monitor Temporarily: While pipe clamps offer a temporary fix, it’s essential to monitor the repair and plan for a more permanent solution.
Benefits of Pipe Clamps for Copper Pipe Repair
Using pipe clamps for copper pipe repair provides several advantages:
- Quick Solution: Pipe clamps offer a swift way to stop leaks and minimize water damage.
- No Special Skills Needed: Repairing with pipe clamps doesn’t require advanced plumbing skills, making it suitable for DIY enthusiasts.
- Temporary Fix: Pipe clamps provide a temporary solution, allowing you time to plan for a more thorough repair.
- Versatile: Pipe clamps can be used on various pipe sizes and materials, offering flexibility in different situations.
Pipe clamps are a valuable tool in your DIY plumbing arsenal, providing a practical and efficient solution for minor leaks in copper pipes. By following the steps outlined in this article, you can temporarily halt leaks, prevent water wastage, and safeguard your property from potential damage. Keep in mind that while pipe clamps can provide relief, a permanent repair may be necessary in the long term. If you’re uncertain about the extent of the damage or the appropriate solution, don’t hesitate to consult a professional plumber for guidance.
5. Sharkbite Slip Coupling Copper Pipe Repair
SharkBite fittings are push-to-connect plumbing connectors that are incredibly user-friendly. They feature a unique design that allows you to simply push the fitting onto the copper pipe, creating a watertight seal. This innovation has made plumbing repairs more accessible to homeowners and DIY enthusiasts, eliminating the need for complex tools and techniques.
Materials Need for Sharkbite Copper Pipe Repair
Before you start, gather the following materials:
- SharkBite Fittings: Purchase the appropriate SharkBite fittings for the size of your copper pipe and the type of repair you need.
- Pipe Cutter: A tool to cut out the damaged section of the copper pipe.
- Deburring Tool or Sandpaper: To smooth the cut ends of the pipe after cutting.
- Safety Gloves: Protect your hands while working with tools and materials.
- Safety Goggles: Keep your eyes safe from debris during the repair.
Step-by-Step SharkBite Fittings Copper Pipe Repair Process
Follow these steps to repair a copper pipe using SharkBite fittings:
- Turn off the Water: Shut off the water supply to the affected pipe to prevent water flow during the repair.
- Drain the Pipe: Allow the pipe to drain completely to minimize water spillage.
- Mark the Pipe: Identify the damaged section of the pipe and mark the area where you’ll be making the cut.
- Cut the Pipe: Use a pipe cutter to make clean, straight cuts on both sides of the damaged section. Remove any burrs from the cut ends using a deburring tool or sandpaper.
- Insert the SharkBite Fittings: Slide the SharkBite fitting onto one of the cut pipe ends. Make sure the fitting is fully inserted and seated.
- Insert the Second Pipe: Insert the other cut pipe end into the other end of the SharkBite fitting. Push until it’s fully seated.
- Check for Proper Connection: Ensure that both ends of the pipe are securely connected within the SharkBite fitting.
- Turn on the Water: Slowly turn on the water supply and monitor the repaired area for any signs of leakage. The SharkBite fitting should create a secure and watertight seal.
Benefits of SharkBite Fittings Copper Pipe Repair Method
Using SharkBite fittings for copper pipe repair offers several advantages:
- No Soldering: SharkBite fittings eliminate the need for soldering, making the repair process more straightforward.
- User-Friendly: The push-to-connect design of SharkBite fittings is easy to use, even for individuals without plumbing experience.
- Time-Saving: Repairing with SharkBite fittings can be completed in a fraction of the time compared to traditional methods.
- Reusable: SharkBite fittings are reusable, allowing you to disconnect and make adjustments as needed.
SharkBite fittings have revolutionized the way plumbing repairs are done, providing a simple and effective solution for copper pipe repair. By following the steps outlined in this article, you can confidently repair a leaky copper pipe without the need for specialized tools or advanced plumbing skills. However, it’s important to note that while SharkBite fittings offer convenience and efficiency, a permanent repair solution may be required in the long run. If you’re uncertain about the extent of the damage or the suitability of SharkBite fittings for your situation, consider consulting a professional plumber for guidance.
6. Cut and Replace Method: Restoring Copper Pipes with Precision
The cut-and-replace method is a time-tested approach for repairing damaged copper pipes. By cutting out the compromised section and installing a new piece of pipe, you effectively eliminate leaks and restore the structural integrity of the plumbing system. This method is particularly suitable for situations where the damage is extensive or multiple leaks are present.
Materials Required for Cut and Replace Copper Pipe Repair Method
Before you begin, gather the following materials:
- Copper Pipe: Purchase a length of copper pipe that matches the size and type of the existing pipe.
- Pipe Cutter or Hacksaw: A tool to cut out the damaged section of the copper pipe.
- Emery Cloth or Sandpaper: To clean and smooth the pipe ends before joining.
- Soldering Torch and Solder: For creating watertight connections between the new pipe and existing pipes.
- Flux: A paste or liquid used to clean and prepare the copper surface for soldering.
- Pipe Cutter or Pipe Deburring Tool: To ensure clean, smooth pipe cuts.
- Safety Gloves and Goggles: To protect your hands and eyes while working with tools and materials.
Step-by-Step Cut and Replace Process
Follow these steps to repair a copper pipe using the cut-and-replace method:
- Turn off the Water: Shut off the water supply to the affected area to prevent water flow during the repair.
- Drain the Pipe: Allow the pipe to drain completely to minimize water spillage.
- Measure and Mark: Identify the damaged section of the pipe and measure the length of the new piece needed. Mark the cutting points.
- Cut the Pipe: Use a pipe cutter or hacksaw to cut out the damaged section of the copper pipe. Ensure that the cuts are clean and straight.
- Clean the Ends: Use an emery cloth or sandpaper to clean and smooth the cut ends of the existing pipes and the new piece.
- Apply Flux: Apply flux to the cleaned pipe ends and the inside of any fittings you’ll be using. Flux helps ensure a strong solder connection.
- Solder the Connection: Use a soldering torch and solder to create watertight connections between the new piece and the existing pipes. Follow proper soldering techniques to achieve a secure bond.
- Cool and Inspect: Allow the soldered joints to cool naturally. Inspect the joints for any visible defects or leaks.
- Turn on the Water: Slowly turn on the water supply and monitor the repaired area for any signs of leakage.
Benefits of the Cut and Replace Method
Choosing the cut-and-replace method for copper pipe repair offers several benefits:
- Long-Lasting Solution: This method provides a lasting repair by eliminating the source of leaks and replacing damaged sections.
- Structural Integrity: By installing a new section of pipe, you restore the overall strength and integrity of the plumbing system.
- Professional Quality: When done correctly, the cut and replace method produces results similar to those achieved by professional plumbers.
The cut and replace method is a robust approach to repairing extensively damaged or leaking copper pipes. By following the steps outlined in this article, you can effectively restore your plumbing system’s functionality and integrity. However, this method requires a higher level of plumbing skills and experience, especially when it comes to soldering connections. If you’re uncertain about any aspect of the process, it’s advisable to consult a professional plumber to ensure a successful and long-lasting repair.
Other Copper Pipe Repair Mathods:
Some other copper pipe repair methods may include:
- Copper Pipe Repair Sleeves: Repair sleeves are metal or rubber sleeves that fit over damaged sections of a copper pipe and are secured in place with screws or fasteners. They provide a quick and temporary fix for leaks and damage.
- Patch Kits: Patch kits often include adhesive patches or tape designed to seal small leaks or holes in copper pipes. They offer a quick and temporary solution for minor repairs.
- Fluxless Solder: Some innovative soldering methods use fluxless solder, which eliminates the need for applying flux separately. This can simplify the soldering process and reduce the risk of overheating.
- Pipe Freezing: In some cases, if the damage is limited to a specific section, you can use a technique called pipe freezing. This involves using a freezing kit to create a temporary ice plug in the pipe while you make the repair.
Common Terminologies Associated with Copper Pipe Repair
There are some other terms that are always associated with Copper Pipe repair. In the next section we will describe those.
Copper Pipe Repair Sleeve:
A copper pipe repair sleeve, also known as a pipe repair clamp or coupling, is a device used to fix leaks or damage in copper pipes. It is designed to cover and seal the damaged area, preventing water leakage and further deterioration. These sleeves typically consist of a metal or rubber material and are equipped with fasteners or screws to secure them around the damaged section of the pipe. Copper pipe repair sleeves offer a quick and temporary solution, helping to stop leaks and prevent water wastage.
Leaky Copper Pipe Repair:
Leaky copper pipe repair refers to the process of fixing pipes that are experiencing water leakage. Depending on the extent of the leak, various methods can be employed, such as using pipe clamps, repair sleeves, soldering, or replacement. The goal is to stop the leak, prevent water damage, and restore the pipe’s functionality.
Copper Pipe Repair Kit:
A copper pipe repair kit is a collection of tools and materials designed to facilitate the repair of copper pipes. These kits often include items such as repair sleeves, pipe clamps, solder, flux, emery cloth, and other necessary components for addressing leaks, cracks, or damage in copper pipes. Copper pipe repair kits provide a convenient solution by offering all the required materials in one package.
Pinhole Copper Pipe Repair:
Pinhole copper pipe repair involves addressing small holes that have developed in a copper pipe. These holes, often caused by corrosion, can lead to leaks over time. Methods for repairing pinhole leaks include using epoxy putty, pipe clamps, soldering, or replacing the affected section of the pipe.
Copper Pipe Repair Patch:
A copper pipe repair patch is a piece of material or tape designed to cover and seal a damaged area on a copper pipe. It offers a temporary solution for stopping leaks and preventing water from escaping. Copper pipe repair patches are often made from rubber, metal, or adhesive materials and can be applied directly over the damaged section.
Burst Copper Pipe Repair:
Burst copper pipe repair involves addressing a pipe that has experienced a significant rupture or break. This type of repair often requires cutting out the damaged section and replacing it with a new piece of pipe. It may also involve using compression fittings, soldering, or other methods to create a secure and watertight connection.
Cracked Copper Pipe Repair:
Cracked copper pipe repair focuses on fixing pipes that have developed cracks due to factors like freezing, physical stress, or corrosion. Depending on the severity of the crack, repair methods can include soldering, using repair sleeves, or replacing the damaged section of the pipe.
Copper Pipe Repair Tape:
Copper pipe repair tape is a self-adhesive tape specifically designed for temporarily sealing leaks or damage in copper pipes. This tape is often waterproof and can create a temporary barrier to prevent water from leaking out. While copper pipe repair tape can offer a quick fix, it’s important to note that it’s not a permanent solution and may need to be replaced over time.
Temporary Copper Pipe Repair:
Temporary copper pipe repair involves using quick-fix methods to address leaks or damage in copper pipes. These methods, such as using repair sleeves, clamps, epoxy putty, or tape, provide short-term solutions to stop leaks and prevent water wastage until a more permanent repair can be carried out.
Split Copper Pipe Repair:
Split copper pipe repair refers to fixing pipes that have experienced a complete separation or split along their length. This type of damage often requires cutting out the split section and replacing it with new pipe. Repair methods can include using compression fittings, soldering, or other suitable connections.
Emergency Copper Pipe Repair:
Emergency copper pipe repair involves quickly addressing unexpected leaks, bursts, or damage in copper pipes to prevent water damage and mitigate immediate risks. This may involve using available tools, materials, and techniques to temporarily stop leaks until a professional plumber can perform a more comprehensive repair.
Broken Copper Pipe Repair:
Broken copper pipe repair is the process of fixing pipes that have completely broken or fractured, resulting in a gap in the pipe. This repair often requires cutting out the broken section and replacing it with a new piece. Methods can include using compression fittings, soldering, or replacement to restore the pipe’s integrity.
Copper Pipe Repair Cost
The cost of repairing a copper pipe can vary widely depending on several factors, including the type of damage, the extent of the repair, the location of the damaged pipe, and whether you choose to do the repair yourself or hire a professional plumber. Here are some cost considerations to keep in mind:
- DIY vs. Professional: If you have the skills and tools to perform the repair yourself, the cost will mainly involve purchasing any necessary materials such as solder, flux, fittings, or repair sleeves. On the other hand, hiring a professional plumber will come with labor costs in addition to materials.
- Materials: The type of repair method you choose will determine the materials required. For example, soldering will require solder, flux, and a torch, while using compression fittings or repair sleeves will involve purchasing those specific components.
- The Extent of Damage: The size and location of the damage will impact the cost. A small leak might only require a simple repair sleeve or a small section of new pipe, while extensive damage might involve replacing a larger section of pipe.
- Type of Repair: Different repair methods have different associated costs. For example, using a simple pipe clamp might be relatively inexpensive, while replacing a larger section of pipe or soldering intricate connections could be more costly.
- Labor: If you hire a professional plumber, labor costs will be a significant factor. Plumbers typically charge by the hour or for the job, depending on the complexity of the repair.
- Additional Costs: Depending on the situation, there might be additional costs such as tools if you’re doing the repair yourself, transportation for a plumber, or any unforeseen issues that arise during the repair.
- Emergency Services: If the repair needs to be done urgently, such as in the case of a burst pipe, emergency services might come with higher costs due to the immediate response required.
It’s challenging to provide an exact cost as it varies so much depending on the specific circumstances. As a rough estimate, simple DIY repairs could cost anywhere from $20 to $100 for materials, while more complex repairs or professional services could range from $100 to several hundred dollars or more. It’s recommended to get quotes from local plumbers if you’re considering hiring professional help, and to factor in the costs of any necessary materials if you’re doing the repair yourself.
Conclusion
Copper pipe repair doesn’t have to be daunting, especially with the right knowledge and tools. Whether you’re dealing with a minor pinhole leak or a more significant rupture, addressing the issue promptly can save you from extensive water damage and costly repairs down the line. Remember to prioritize safety, assess the damage accurately, and choose the appropriate repair method for the best results. If you’re not comfortable with DIY repairs, don’t hesitate to seek professional help to ensure a successful and long-lasting fix for your copper pipes.


